Last class, we learned about the List Abstract Data Type (ADT), where elements are ordered relative to one another, and the ArrayList
implementation that stored items behind the scenes in an array with restricted index access.
However, as we hinted before, if List is the data type (the “what”), then ArrayList is merely one type of implementing data structure (the “how”).
Remark
There are some List operations at which ArrayLists both excel/struggle, but perhaps different implementation strategies have their own pros and cons.
Toolkit
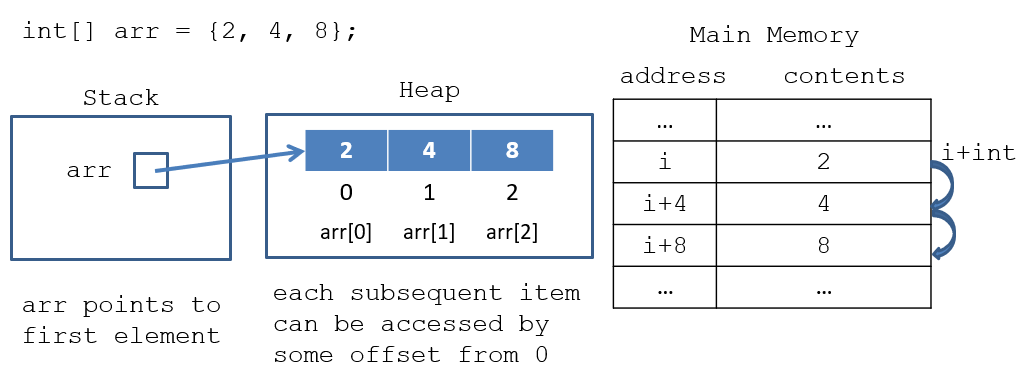
Among other things, ArrayLists excel at arbitrary element access at a given index due to a property called random access.
This is what allows us to ask for any contained element in an ArrayList at an arbitrary index and receive / change the value in its underlying array instantly.
To understand a bit about random access:
Depicted:
Question
What some operations or properties that felt rather cumbersome or wasteful in our Array List implementation of a list?
Answer
(1) Insertion and deletion not at the end of the list — had to shift everything over! — and (2) in order to
avoid having to grow the underlying array very often, we would double the array size, and would then need to copy everything over from the old array to the new.
Example
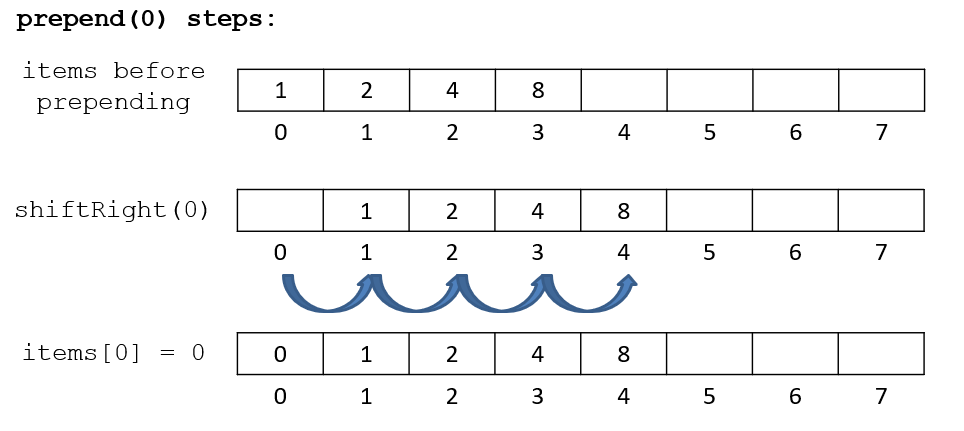
As an example, consider prepending some value to an ArrayList with other values already inside, then illustrate the shifting procedure.
Remark
This shifting / copying procedure is not free and takes computational effort!
As such, since ArrayLists aren’t all sunshines and butterflies, let’s look at another implementation of a List today, known as a Linked List.
Linked Lists
Definition
A linked list is an implementation of the list ADT, except that instead of arrays storing the position of each list element,
the relative order of data is stored through data nodes with references that point to next / previous nodes in the sequence.
Definition
A linked list node is an object used to enclose the data being stored, as well as references to the next node in the chain (in the case of
a singly linked list), or references to both the next and previous node in the chain (in the case of doubly linked lists).
Depending on your needs, you may implement either a singly or doubly linked list, but we’ll examine the simpler today: the singly linked list.
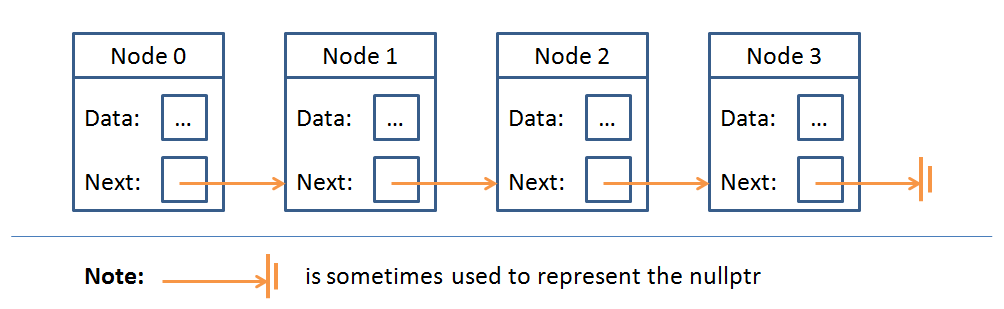
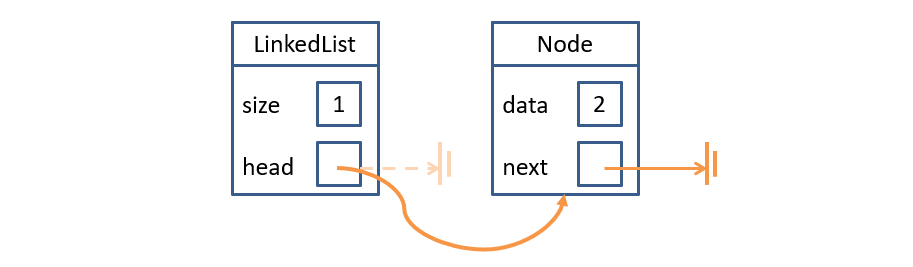
Let’s start out by seeing what a linked list looks like pictorially:
(where nullptr is just an abbreviation of null pointer, which is simply a reference that has been assigned the value null).
Definition
Note: just like the contents of any sequential list index, the data field of any node can contain data (or references to data) of
any type (even another linked list!).
Inside Linked Lists
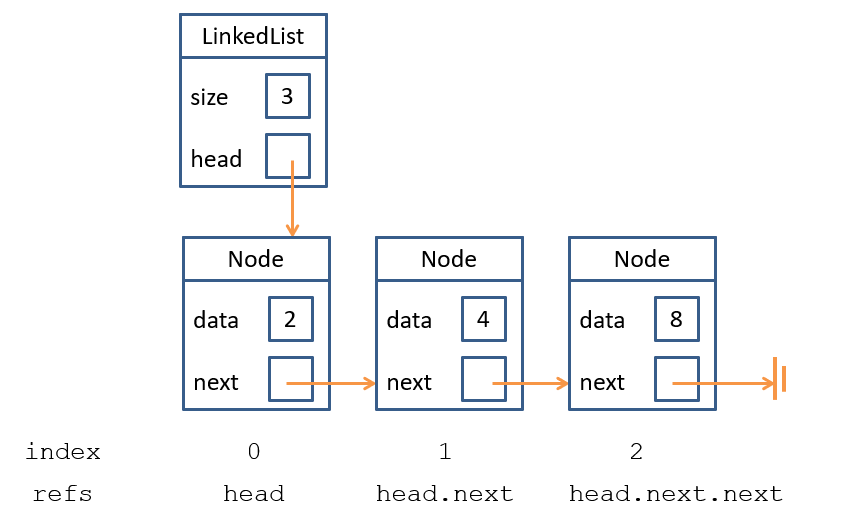
Let’s examine the contents of a linked list, starting with each Node:
Toolkit
As mentioned, the data field contains the “meat” of the linked list, and can hold data of any type.
By analogy, you can think of the data attribute as the individual items stored in an array’s indexes; the Node simply houses this data in a LinkedList.
Toolkit
The next field in each Node simply contains a reference to another Node, or is set to null to indicate that it is the
last element in the list.
Remark
Note: There are also implementations of linked lists where null is never used; for instance, circular
linked lists simply connect the last Node to the first, and can check if any Node is the final by seeing if its next is the same as the first!
Which brings us to the next component…
Remark
The linked sequence of nodes are the internal storage mechanism for a Linked List, similar to how we store items in an Array List
using an array (behind the scenes).
As such, there are two separate classes to be designed here:
The Linked List Nodes: as depicted above with stored data and references to other Nodes in the sequence.
The Linked List Itself: which keeps track of the Nodes internally, has a public interface, etc.
Question
Although we’ve thought about the fields of the Nodes, what fields should we record-keep in the Linked List itself?
Answer
Some typical fields:
size of the Linked List, tracking how many elements are stored within.
head reference to the first Node in the Linked List.
tail reference to the last Node in the Linked List.
In a non-circular LL implementation, the head / tail are, conventionally, set to null when the list is empty.
Example
Knowing what you know about memory management, and the fields of a Linked List as described above, draw heap contents of an IntLinkedList containing
3 ints {1, 2, 4} with only a head reference pointing to the first Node.
Linked List Operations
Now that we’ve seen the internals of LinkedLists and their Nodes, let’s look at a few of the operations that we’ve seen lists support:
Just like the operations in ArrayLists, LinkedLists host a variety of operations for accessing, adding, removing, and otherwise manipulating their contained data.
However, because our data organization is different for LinkedLists, the implementations of these operations will vary.
Inserting Values
Toolkit
Inserting a new item into a LinkedList generally follows a 3-step process:
Create a new node containing the data to add
(Sometimes) Find where that node should go in the sequence
Repair necessary references (both of surrounding Nodes and possibly the LinkedList’s head/tail) so that the relative order of items is respected
In other words, inserting into LinkedLists is quite simple when we know where we want to insert the new Node
This is pretty easy in a couple of situations, and harder in others. Let’s start with an underhand pitch:
Example
The simplest of insertion tasks: inserting into an empty LinkedList.
Question
If inserting into a LinkedList is most difficult when we must first find where to insert, what would be the second easiest case since we
maintain certain references in the LL itself?
Answer
Inserting at the head or tail!
Example
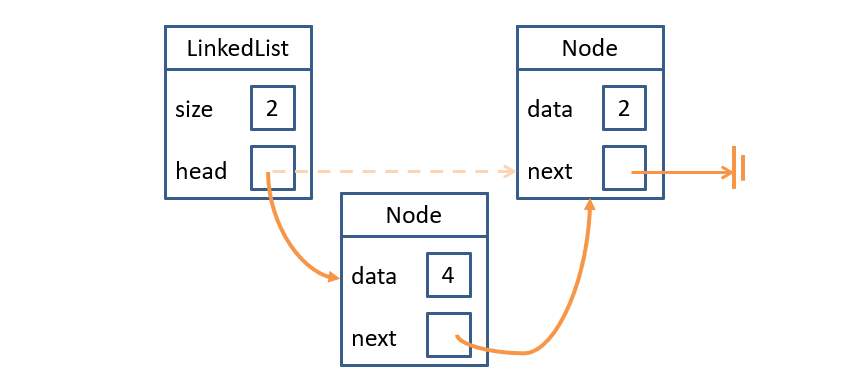
The second simplest: inserting at the head, or prepending (likewise, inserting at the tail, or appending if we maintained that field too).
The steps here:
Set the new node’s next to reference the currently first.
Update the head to reference the new node.
Done! Later, we’ll see how simple this insertion is.
Example
However, what if we want to insert an element in the middle of the list? Now things are a bit tricky.
Question
Can we access linked list nodes by index like we do with arrays? (e.g., intArray[1] returns the element at intArray’s second position.)
Answer
No! Remember, the way we maintain ordering in a linked list is through references, which are not inherently index-able by simple
arithmetic of memory addresses: the trick behind arrays.
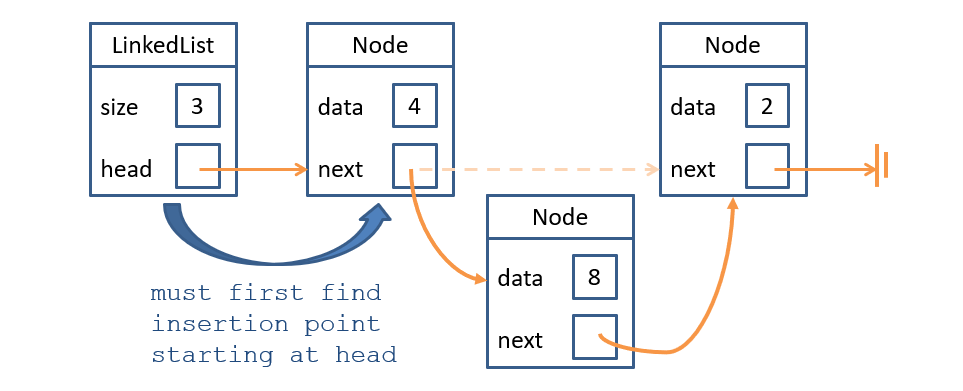
This presents a small problem. If we want to insert a Node anywhere in the linked list except for the front, we have to find where to insert it first!
So, the steps are slightly different:
Find the position in which to insert the new node by explicitly “walking” the references from the head.
Set the next reference in the node previous to that position to now reference the new node.
Update the new node’s next reference accordingly.
For a middle-of-the-list insertion, this might look like the following:
Shortly, we’ll look at how these different insertion formats compare to the sequential list implementation.
Removing Values
As with any operation in linked lists, the main difficulty is making sure that we’ve updated our references properly.
This is especially true with removing Nodes in a linked list.
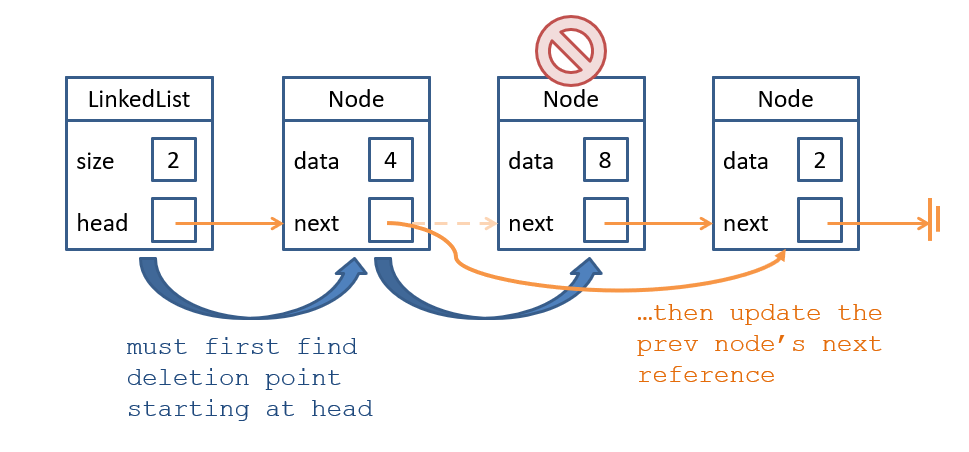
The steps for removing a Node are as follows:
Find the Node you want to remove (same way as with insertion), and for this discussion, we’ll refer to this Node as “RN” (Removed Node)
Update the Node to the left of the RN to point to the Node to the right of the RN, and vice versa if doubly linked.
Update any record-keeping fields, like the linked list’s head reference if the RN was the first in the list (or the size field if record-kept).
Let’s look at how this might be depicted:
Note above that we delete the Node with data “great” and redirect the next reference of its predecessor to the “examples” Node.
Now the only thing left to consider is how we procedurally “find” Nodes in our linked list.
Since we can’t use index access like with arrays / ArrayLists, we turn to a new means of accessing elements.
Accessing and Iterating
Remark
Arbitrary element access in a LinkedList is costly, and requires that we iterate over each reference until we find the query index
or contained item for which we were searching.
Toolkit
That said, we can adopt an interesting new for-loop syntax for iterating over the contents of a LinkedList from within the LinkedList’s methods:
for (Node n = this.head; n != null; n = n.next) { // Loop body: n is now a reference to each node in sequence}
Remark
This is a convenient syntax for us to implement LinkedList methods because we have access to Nodes and their references… but what about users
of our LinkedList who do not have access to private fields?
Question
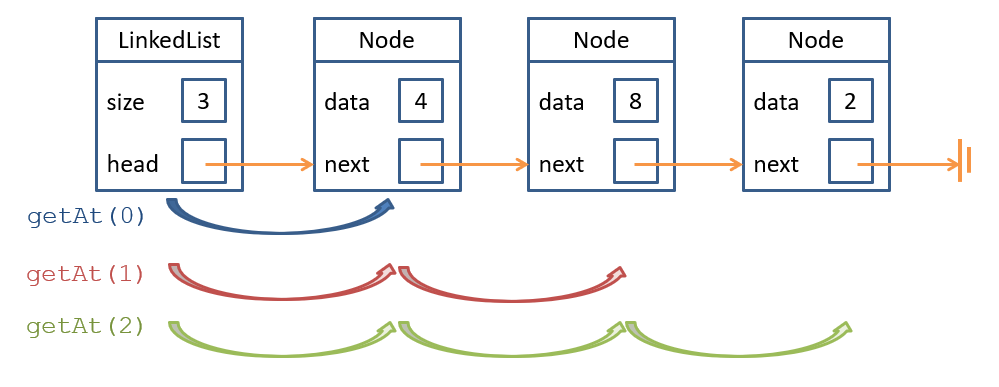
There’s one problem with this operation if we recall the getAt(index) method that was super simple for ArrayLists; what
is the issue for LinkedLists that do no support random access?
Answer
We would need to find the index associated with the query index parameter starting at the head each time!
If we were to access every element in a linked list sequentially by starting at the head node each time, it would be very expensive!
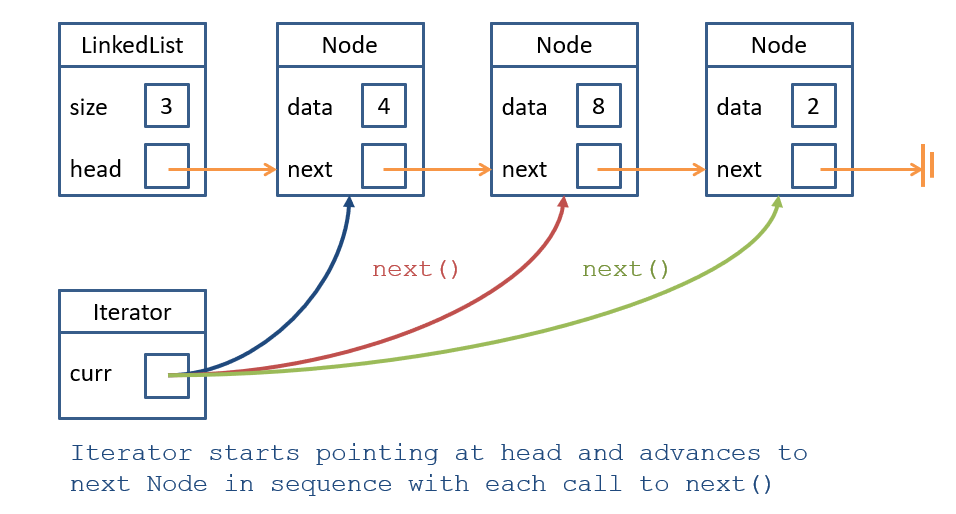
Sometimes we want to keep track of where we are in a LinkedList with the help of what’s generally known as an Iterator.
Definition
An iterator is an object defined on top of a data structure that allows users to efficiently access (and sometimes modify)
the elements of that structure by maintaining a “sliding” reference to each element.
That’s a bit of a vague definition, but consider an iterator object defined on a given linked list that can be asked to move to the previous Node, next Node, or
to access the data of the one it is looking at.
Example
To see why an Iterator might be useful, consider having a Linked List of many Nodes, and needing an operation that iterates through each. Draw
the steps associated with this operation with an Iterator! compared to the above without.
We’ll see how this can be implemented next using some new Java tools.
Inner Classes
Remark
Note that above, we have the concept of 2 other classes (Nodes and Iterators) that are tied to the definition of the LinkedList that they are used
to support.
Often times, when we want our “helper classes” to be able to access fields of the main class, we can define them as nested classes:
Definition
Non-static Nested classes (AKA inner classes) may access the fields and methods of an instance of the outer class,
and are typically defined at the top / bottom of the main class definition (depending on where they are most adjacently referenced).
Toolkit
Inner Classes are treated just like other object fields, but help to organize and maintain the outer class they support.
Toolkit
Since we don’t want users of our IntLinkedList class to be able to access Nodes directly, we’ll make it a private inner class.
Toolkit
Since we do want users of our IntLinkedList class to be able to create new Iterators, we’ll make it a public inner class.
Toolkit
An inner class that is private cannot be instantiated or used outside of the class, but those that are public can be.
In our case, we’ll enforce our Iterator to be created from only existing IntLinkedList objects, but more on that later…
Here’s a scaffold that illustrates how we want to structure our 3 classes:
public class IntLinkedList { // Inner class definitions: private class Node { // TODO } public class Iterator { // TODO }}
Implementing Linked Lists
In this implementation tutorial, we’ll cover the basics of a singly linked list with a defined Iterator.
Before that, let’s remind ourselves of the basic operations we defined in the IntList Interface (errr, bad sentence, I guess that’s like
saying an ATM Machine or PIN Number…):
public interface IntList { public int getAt (int index); public void append (int toAdd); public void insertAt (int toAdd, int index); public void removeAt (int index);}
Remark
Recall: Interfaces specify the what we want defined, and Data Structures provide the concrete implementations or how
they are.
Just as we implemented this interface with the IntArrayList class
To do so, we’ll be creating 3 classes:
The IntLinkedList class itself
The Node inner class to hold the data of the linked list
The IntLinkedList.Iterator inner class to define Iterators on our linked lists to be used by users of our class for safely accessing elements.
Designing Nodes
Let’s start by designing our Nodes, which is quite simple: as we said, in a singly linked list, they contain only the data and a reference to the next Node in the chain.
So, that gives us:
...private class Node { // Since this class is private and inner, no need // to access restrict its fields; they're safe! int data; Node next; Node (int d) { this.data = d; this.next = null; }}...
Designing the IntLinkedList
With our Nodes in place, we can now turn our attention to designing the IntLinkedList itself.
Toolkit
Recall: implementing an interface means we need at minimum implement the methods listed, but that doesn’t also mean we can’t provide
additional methods in our implementation.
As such, for this tutorial, we’ll implement 3 methods in addition to those promised by the IntList:
public int size (); returns the number of elements currently in the IntLinkedList.
public int prepend (int toAdd); adds the given int toAdd to the the head of the IntLinkedList.
public Iterator getIterator (); returns an Iterator starting at the host LinkedList’s head.
Let’s start out easy by defining our fields, constructor, and then the size, append, getAt methods.
public class IntLinkedList { private Node head; private int size; IntLinkedList () { // Not strictly necessary for either fields since // these are the default values for each this.head = null; this.size = 0; } public int size () { return this.size; } public void append(int toAdd) { Node toAppend = new Node(toAdd); this.size++; // Case 1: Node being added is only node if (this.head == null) { this.head = toAppend; return; } // Case 2: Need to find end before adding Node current = head; while (current.next != null) { current = current.next; } current.next = toAppend; } public int getAt(int index) { if (index >= size || index < 0) { throw new IllegalArgumentException("index out of legal range"); } // Find index requested by advancing a // reference named current Node current = this.head; while (index > 0) { current = current.next; index--; } return current.data; } // Inner classes elided ...}
Question
Reflecting on our implementations of append, getAt above, identify some inefficiencies and suggest improvements.
Answer
(1) append has to start at the head and find the end of the list each time! Instead, we could maintain a tail reference to always
be able to instantly add a node. (2) getAt must traverse the list from the head each time to find its index; if used many times, we should instead define
and employ an Iterator to go through the list (to be defined shortly).
Just to verify our work with some empirical tests…
package intlist;public class IntLinkedListTests { public static void main (String[] args) { IntLinkedList llCoolJ = new IntLinkedList(); llCoolJ.append(1); llCoolJ.append(2); llCoolJ.append(3); System.out.println(llCoolJ.getAt(0)); // 1 System.out.println(llCoolJ.getAt(1)); // 2 System.out.println(llCoolJ.getAt(2)); // 3 }}
Simple enough! Now let’s tackle a prepend method, which isn’t strictly required by the interface, but which we’ll add anyways.
Remark
Recall: one operation that was computationally difficult for ArrayLists was prepending an item; let’s see how Linked Lists actually excel with this.
The trick here is careful record-keeping. We have to remember that prepending to a linked list can occur in a couple of cases: (1) when it’s empty, and (2) when there
is at least one item already added.
If we’re clever, we can structure our prepend method to handle both of these cases elegantly:
package intlist;public class IntLinkedList { ... public void prepend (int toAdd) { // Remember the current head, which will be either: // - null (empty list) // - a Node (non-empty list) Node currentHead = this.head; this.head = new Node(toAdd); this.head.next = currentHead; this.size++; } ...}
Super easy and elegant! How about you try one on your own…
Example
Add a method to IntLinkedList called public void removeAt (int index); that deletes the Node at the given index and repairs references
accordingly.
...public void removeAt (int index) { if (index >= this.size || index < 0) { throw new IllegalArgumentException("index out of legal range"); } Node current = this.head, prev = null; // Find the Node just before the one to remove // (if there is one before it) while (current != null && index > 0) { prev = ???; current = ???; index--; } // [!] Remove it, and account for edge cases if (current == this.head) { ??? } if (prev != null) { prev.next = ???; } this.size--;}...
We can also test it briefly:
package int_linkedlist;public class IntLinkedListTests { public static void main (String[] args) { IntLinkedList llCoolJ = new IntLinkedList(); llCoolJ.prepend(3); llCoolJ.prepend(2); llCoolJ.prepend(1); llCoolJ.removeAt(1); System.out.println(llCoolJ.getAt(0)); // 1 System.out.println(llCoolJ.getAt(1)); // 3 }}
Lastly, we want to design our Iterator inner class before we provide a way to create Iterators from the IntLinkedList.
Designing the IntLinkedList.Iterator
Remark
The Iterator class we’re about to design will be useful for… well… iterating through our linked list elements efficiently, and can even be used to manipulate the
list.
We’ll use a single field: a reference to a Node that can be changed to point to the “current” Node in the list during iteration.
We’ll also implement 3 methods for the Iterator to be able to navigate the linked list:
public boolean hasNext (); returns true if there are more Nodes after the current one
public void next (); advances the iterator to reference the next Node in the chain
public int getCurrentInt (); returns the int contained in the currently referenced Node.
So, that gives us the following:
package intlist;public class IntLinkedList { ... /** * Defines a new Iterator on the current LinkedList */ public class Iterator { private Node current; // [!] Note: we'll make this a private constructor because we want users // to get Iterators through our IntLinkedList's getIterator method private Iterator (IntLinkedList host) { this.current = host.head; } public boolean hasNext () { return this.current != null && this.current.next != null; } public void next () { if (this.current == null) {return;} this.current = this.current.next; } public int getCurrentInt () { return this.current.data; } } ...}
Now, the only thing left is to provide a means by which our IntLinkedList users can actually create an Iterator.
Note: the Iterator’s constructor is defined on a current IntLinkedList object, and so we can create a method in the IntLinkedList class to return a new Iterator
starting at the head position:
package intlist;public class IntLinkedList { ... public Iterator getIterator () { return new Iterator(this); } ...}
In brief, our getIterator returns a new Iterator object starting at the head of the Linked List of which it’s a part — it will have access to the head because
it’s an inner class!
Testing
Although, as usual, we should thoroughly test our new class(es), let’s just get a quick gist for how we might use the above.
package intlist;public class IntLinkedListTests { public static void main (String[] args) { IntLinkedList llCoolJ = new IntLinkedList(); llCoolJ.prepend(3); llCoolJ.prepend(2); llCoolJ.prepend(1); IntLinkedList.Iterator it = llCoolJ.getIterator(); System.out.println(it.getCurrentInt()); // 1 it.next(); // Advance the iterator one node System.out.println(it.getCurrentInt()); // 2 it.next(); // Advance the iterator one node System.out.println(it.getCurrentInt()); // 3 }}
Example
GREAT Exercise: Revise the IntLinkedList class to have a tail pointer as well as a head.
Remark
Note: the above implementation is workable, but there are a NUMBER of improvements we can make to it; you’ll perform one such optimization for your next homework
by making it doubly-linked and circular!
Linked Lists vs. Array Lists
A reasonable question you might be asking is: so why do we care about the different implementations of the List ADT? It seems that, ostensibly, the two do the same thing in slightly different ways.
Although we will formalize this distinction in the near future, the key motivations for choosing one over the other depend on your intended operations for the data structure:
Operation
Array Lists
Linked Lists
Retrieval
Array lists support random access (able to access elements by index), which can be done instantaneously.
Linked lists require an iterator to navigate to, and then access elements, which can be costly.
Insert / Remove from End
Array lists can add / remove elements from their tail end with ease.
Linked lists can add / remove elements from their tail end with ease, assuming a tail reference is maintained.
Arbitrary Insertion
Array lists must shift elements right every time they make an insertion that is not at the end.
Linked lists merely insert items by repairing references around a node, which can be done instantaneously as long as we know where the insertion is to take place.
Arbitrary Removal
Array lists must shift elements left every time they make a deletion that is not at the end.
Linked lists merely delete items by repairing references around a node, which can be done instantaneously as long as we know where the insertion is to take place.
Scalability
Every time Array lists grow to accommodate more entries, they must copy over all elements of the old array into the new, which can be costly. That said, future growth is simple, since more space has been allocated.
Linked lists can grow and shrink at will simply by removing or adding new nodes. However, dynamic allocation of new nodes is not without cost.
tl;dr:
Use Linked Lists when you’re inserting or removing a lot not at the end of the list, or when you have absolutely no idea how many elements you plan to store in the collection.
Use Array Lists when you need fast access to arbitrary elements, or when you have a good idea for how many elements you plan to store in the collection.
A Note on Interfaces
Thus far, we’ve seen two separate Data Structures (IntArrayList vs. IntLinkedList) implementing the same Interface (IntList).
There are actually some additional properties of Interfaces that we should explore for object instantiation.
Toolkit
Classes implementing an interface can instantiate objects using references of the type of the interface, rather than the class.
Effectively, this limits the public interface of the objects to only those methods defined in the interface, even if the implementing class defines additional
methods.
public static void main (String[] args) { IntList inty = new IntLinkedList(); inty.append(5); // OK because append is in the IntList inty.prepend(1); // NOT OK because prepend is not in the interface}
Although a somewhat baffling idea now, we’ll see in the coming week why it can be useful to restrict users to a particular interface over a more expansive one.
Toolkit
Parameters can be specified as the implementing interface type, soas to accept any implementing class.
Example
Consider the sum method, which might return the sum total of all ints in the given IntList; it can be called with either IntArrayList
OR IntLinkedList arguments (unlike if the parameter were specified as either).
public static int sum (IntList listy) { // ...}public static void main (String[] args) { IntLinkedList llCoolJ = new IntLinkedList(); IntArrayList arry = new IntArrayList(); // ... add some items to each here ... System.out.println(sum(llCoolJ)); System.out.println(sum(arry));}
Java Collections Framework
This might be a bit of a shocker to everyone, but you know all those data structures we’ve been implementing ourselves?
Well… turned out they’re pretty nifty… so nifty in fact, that there’s a class for almost every ADT in the Java Collections Framework.
Definition
The Java Collections Framework is a library of concrete data structures that implement ADT interfaces.
Using the JCF
Let’s look at how to use the Collections and consult their documentation.
Let’s look at the different types that we’ve learned about so far, which we can click on to consult their documentation:
ArrayList or Vector:
sequential list implementations whose only real difference is how they grow their arrays when space is needed.
On the above linked pages, you can find documentation for all of the public interface methods for each data structure, but first, let’s look at how to use them.
Step One: Import Class
You first have to import the collection you want to use; for this example, let’s make a new ArrayList of Strings:
import java.util.ArrayList;
Step Two: Create Instance
Definition
Because the Collections framework is designed to work for holding items of any arbitrary class, we use Java generics to specify
the type of data we want our collection to hold.
Toolkit
The syntax for initializing a generic type <T> is:
Collection<T> dsName = new Collection<T>();// Alternately, can leave off the second generic declarationCollection<T> dsName = new Collection<>();
For example, to create a new ArrayList of Strings, we simply write String between the brackets:
ArrayList<String> arr = new ArrayList<String>();// Or:ArrayList<String> arr = new ArrayList<>();
Step Three: Use Instance
We now consult the ArrayList class’ documentation to see what methods we have available. Let’s add and remove some items now!
ArrayList<String> arr = new ArrayList<>();arr.add("a"); // Appendarr.add("b");arr.add("c");arr.remove(1); // Removes "b" at index 1System.out.println(arr.get(1)); // What gets printed?
Toolkit
Note that Generics are required to be reference types (since references all take up the same amount of memory but can point to objects that are
arbitrarily large or small).
This means that to use Java collections with primitives like ints, we instead supply Java’s “wrapper” classes such as Integer, but can
then use them just like they’re ints:
ArrayList<Integer> arr = new ArrayList<>();for (int i = 0; i < 100; i++) { arr.add(i);}
Toolkit
Make sure to consult the JavaDoc pages for more information on how to use each collection, as well as their available methods!
Efficiency Concerns
Remark
Note that none of this juxtaposition between Array and Linked lists would be worthwhile if there weren’t also efficiency benefits / risks from
one choice over the other!
We’ll examine this more formally later in the class, but for now, consider the following test…
Example
Suppose we decide to prepend (i.e., add to the front index) some TEST_SIZE number of ints to both an ArrayList and
a LinkedList. Which do you think will take longer to complete, as timed by JUnit? What happens if we double TEST_SIZE? Quadruple?
import static org.junit.Assert.*;import java.util.*;import org.junit.Test;public class PrependTest { private static int TEST_SIZE = 200000; @Test public void testArrayListPrepend() { ArrayList<Integer> arr = new ArrayList<>(); for (int i = 0; i < TEST_SIZE; i++) { // [!] Adding i to index 0 = prepend operation arr.add(0, i); } } @Test public void testLinkedListPrepend() { LinkedList<Integer> arr = new LinkedList<>(); for (int i = 0; i < TEST_SIZE; i++) { // [!] Adding i to index 0 = prepend operation arr.add(0, i); } }}
Concerns with efficiency will be a major focus of this course… but that’s about all this particular lecture can handle!