A stored memory address pointing to the location in the heap where an object is stored.
Question
What will the following code print out? Explain your answer.
...Burnymon burny1 = new Burnymon("Dave");Burnymon burny2 = new Burnymon("Dave");System.out.println(burny1 == burny2);...
Answer
false: because Burnymon are objects, the expression burny1 == burny2 compares the equivalence of
two Burnymon references. Since burny1 and burny2 point to two different Burnymon objects in the heap, their addresses are different, and so the expression is false.
Array Lists - Overview
Oh happy day, we’re going to cover our first data structure today! (even if it’s one that you’ve all experienced before)
First, let’s remind ourselves of a couple of definitions:
Question
What is a “data type” (sometimes called an Abstract Data Type [ADT]) and how is it different from a “data structure?” [DS]
Answer
ADTs describe the “what,” including expectations over data and behaviors, while DSs describe “how” the ADT is implemented.
Recall our analogy that an ADT is like a Calculator’s Buttons and a DS is like its circuitry and digital logic.
Remark
In other words, ADTs describe the interface (the ADT), which are then
implemented into concrete classes (the data structure.
The first ADTs we’ll examine are everyone’s favorites growing up: Lists!
Lists
Definition
A List is an ADT in which data is stored in an ordered sequence, and duplicate values in the collection are allowed.
Definition
An array list is a data structure implementing the list ADT such that elements maintain a relative order
to one another and are indexed + stored like arrays.
Definition
A collection is a data structure responsible for holding some number of data elements in a particular fashion.
Remark
As such, a List is an ADT that is also a Collection, and an Array List is a List.
In general, most data collections support several basic types of actions (of which there can be multiple formats):
Insertion: add an element to the collection
Deletion: remove an element from the collection
Retrieval: return an element at a given position in the collection / ask if an element is within the collection.
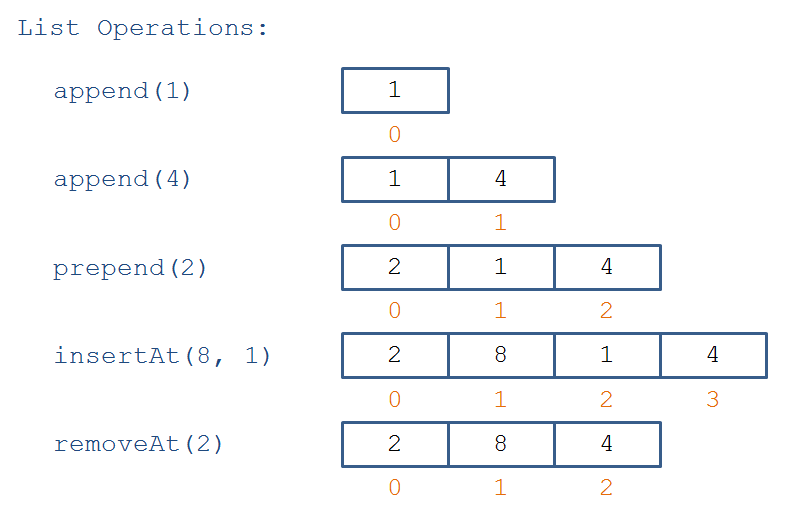
Array lists are one such structure; let’s look at some supported operations (not an exhaustive list [pun intended]):
As we can see, array lists share a lot in common with arrays, but have a few extra caveats.
Some things to note about the above:
The list can be of variable size to accommodate any number of inserted entries.
The items are arranged relative to one another. Note that insertAt(8, 1) placed an 8 at index 1 and then shifted all of the other elements to the right.
Question
Note that primitive arrays already resemble this behavior, but with key differences that we’ll need to address;
what are the key differences between arrays and array-lists?
Answer
Arrays are fixed-size and 2) arrays do not maintain a relative ordering of items; e.g. “removing” an object
from index 0 of an array does not automatically shift everything to the right down; in fact, primitive arrays don’t really have the notion of “removing” an item.
That said, arrays are close enough to the data structure we’re after, so we’ll examine these limitations and how we can structure our implementation to
conquer them.
Before that, though, we need to understand a little something about memory organization and how it applies to arrays.
A Closer Look at Arrays
Before we start designing our contiguous lists concretely, we need to understand a bit more about how arrays work at the memory level.
Definition
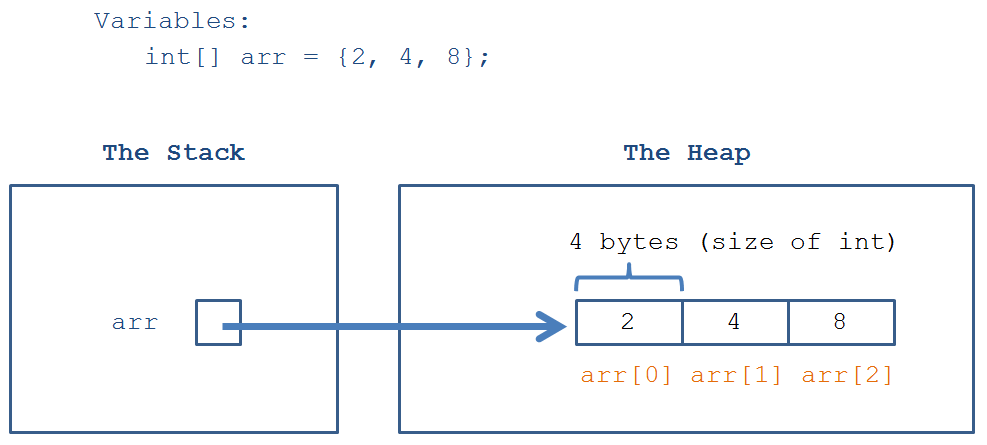
Arrays are objects, and therefore possess a reference that store their elements in the heap.
Pictorially, this might look like the following:
Observe that when we use the declare-and-instantiate syntax for arrays, i.e., int[] arr = { ... };, we reserved space for 3 ints in the heap, and then
populated that memory with the initialized values.
This poses a problem if we’re using arrays to implement our array lists.
Remark
Limitation 1: Arrays are fixed length in Java, meaning that they do not change their allocated memory once it is reserved.
In other words, once an array has been instantiated, we can’t change its length!
This is a problem if we want to implement our array list’s insertion behavior without having to worry about storing a predeterminate number of items.
Definition
An array can be instantiated using the dynamic allocation syntax, such that we specify how much room we want to reserve at run-time.
Toolkit
Recall: the dynamic allocation syntax for an array is: Type[] name = new Type[size];
Why “dynamic allocation?” Dynamic because we can request memory allocated for an array of whatever size we want (memory allowing) at runtime, rather than needing
to know its fixed size at compilation time (in other words, size above can be a variable).
However, this is only one part of the solution that we’ll need to finally implement an array list… because what we allocate here will still be fixed-size.
This brings us to the second shortcoming of arrays as array lists:
Remark
Limitation 2: Arrays do not support arbitrary index insertion / deletion while preserving relative order of the items.
Example
For instance if I have an array like int[] arr = {1, 2, 3}; and I want to insert 8 at index 1, I cannot simply say arr[1] = 8;,
because this statement will overwrite the 2 at index 1 (rather than shift it and the 3 to the right as we did using our insertAt behavior above).
Remark
The solution: delegate the more complex insertion / deletion behavior to a new class’ method!
The bottom line: arrays are almost supportive of the array list expected interface, but have some shortcomings.
Thus, we have to find a way to model the array list behavior while overcoming the shortcomings of arrays.
Remark
Insight 1: We can store our ints (internally) as a primitive array, that should always have space for more ints than are currently
in the IntArrayList, but never less.
Remark
Insight 2: We’ll also want to keep track of the number of ints we have stored in our array of ints, so we’ll have a tracking
field for the size as well.
Remark
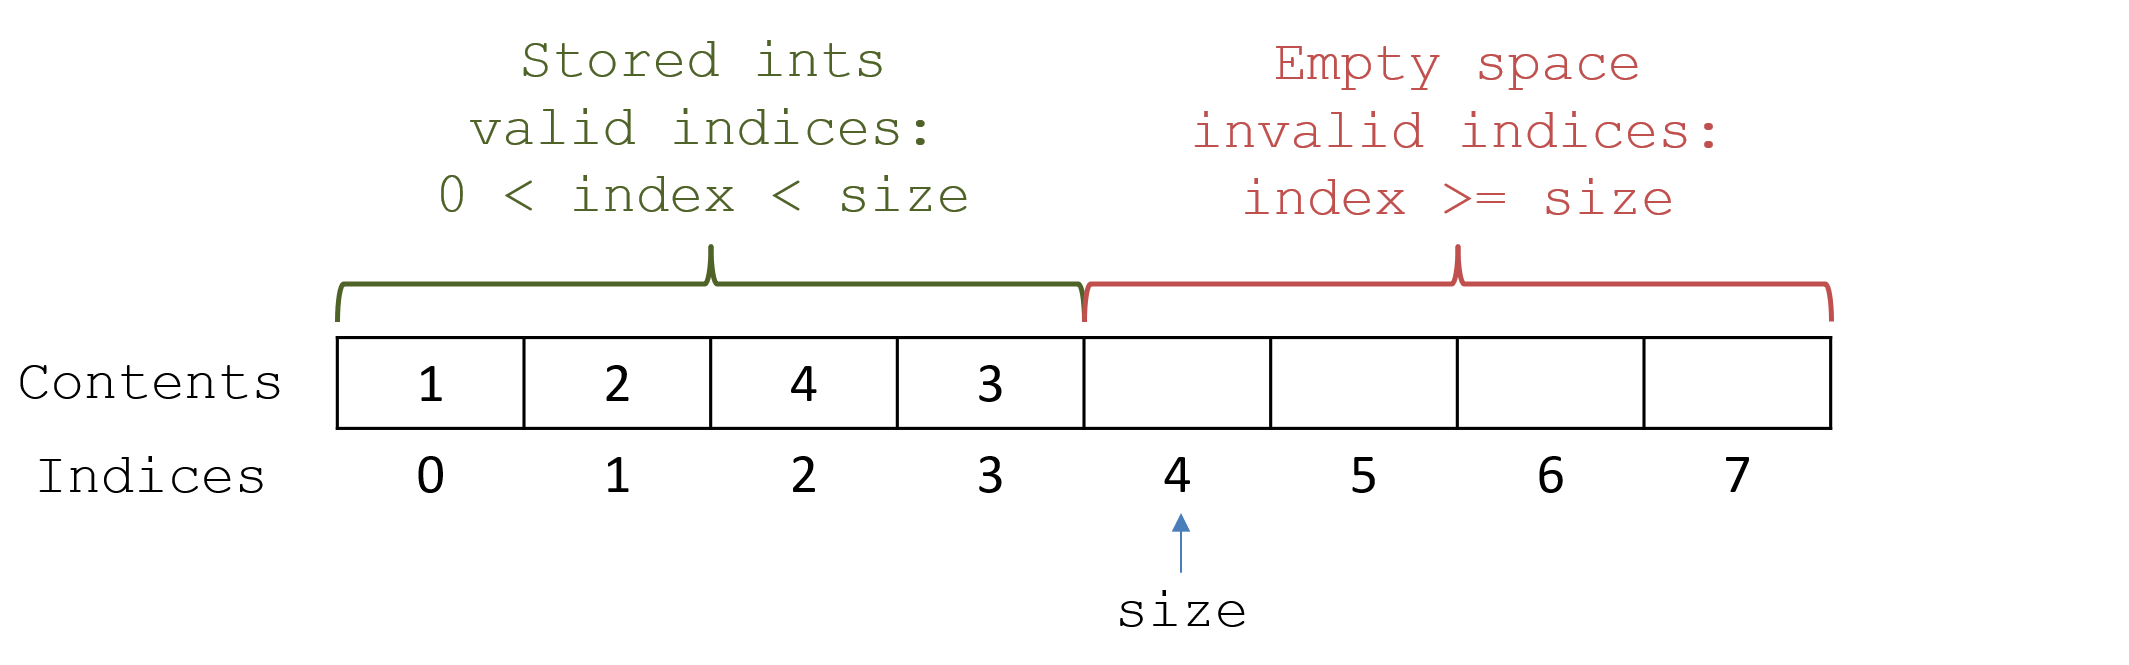
Insight 3: The size field serves another purpose: it indicates which elements in our array at which indexes are “valid”
and thus contain the elements we’d like it to, and which are “invalid” and therefore should be inaccessible to the user.
Organizationally, our fields should look like the following:
Array Lists - Implementation
Before we start designing our first data structure in class, you should know something…
…these data structures are very popular… so popular, that Java (and most other languages) include packages for every ADT we discuss in this course.
Definition
The Java collections framework is a library of implemented collection ADTs, one of which is the java.util.ArrayList class
(among others).
That said, since this is a course on data-structure first-principles, we will be largely designing these collections ourselves.
Whew! Disclaimer done… let’s summarize our quest:
Example
Design an implementation of the array list ADT that supports dynamic sizing (arbitrary length) and relative item ordering for ints. Call this the
IntArrayList class.
Here’s an interface to support the basic operations, as noted earlier:
package main.intlist;public interface IntList { public int getAt (int index); public void append (int toAdd); public void insertAt (int toAdd, int index); public void removeAt (int index);}
Step 1: Design fields
We said that an array is almost what we want for an array list, so we’ll use an array of ints as a basis field. We can then use dynamic allocation to “grow” the
array as items are inserted.
This gives us the following scaffold, in which we have 2 fields: int[] items to hold the actual int values stored within, and size to
record-keep how many are presently stored.
package main.intlist;public class IntArrayList implements IntList { // Fields private int[] items; private int size; ...}
Step 2: Design constructor
OK, pretty simple so far, but now we need to initialize our array and instantiate the size to 0 (assuming it’s empty from the start).
Remark
Insight 4: One of the chief challenges here will be choosing the starting size of the array data member “items”;
reserve too much space and we waste memory, but too little and we’ll run out of space very quickly.
Since we don’t know how many items the user will necessarily need in the ArrayList at the start, let’s just choose a starting allocation of room for 8 ints.
package main.intlist;public class IntArrayList implements IntList { // Class Constants private static final int START_SIZE = 8; // Fields private int[] items; private int size; // Constructor IntArrayList () { this.items = new int[START_SIZE]; this.size = 0; } ...}
So far so good! (notice I made the start size into a private static variable so that if I want to change it in the future, I only have to change it in one place!)
Now, let’s start with some easy methods and see the challenges that might arise:
Step 3: Design methods
Example
Let’s start with the public void append(int toAdd); method that adds the given int toAdd to the end of the ArrayList.
This raises the question of what we consider the “end” of our ArrayList, since this will be the next-available index that should become valid.
Remark
Insight 5: here’s where we get some added utility from our size field: it also record-keeps the next available
index at the end of the valid indexes!
Common Misconception: note here that the size field and items.length properties will ONLY BE THE SAME
IF THE items ARRAY IS FULL
In other words, since our starting size is room for 8 ints, then as soon as we want to add a 9th, we have to grow our storage to accommodate more.
“Growing” our list means that we need to reserve more space in our items array, so we’ll be clever and make a private helper that uses dynamic allocation:
.../** * Expands the size of the list whenever it is at * capacity */private void checkAndGrow () { // Case: big enough to fit another item, so no // need to grow if (this.size < this.items.length) { return; } // Case: we're at capacity and need to grow // Step 1: create new, bigger array; we'll // double the size of the old one int[] newItems = new int[this.items.length * 2]; // Step 2: copy the items from the old array for (int i = 0; i < this.items.length; i++) { newItems[i] = this.items[i]; } // Step 3: update IntArrayList reference this.items = newItems;}...
Now, whenever we want to add an item, we can just call checkAndGrow()!
How simple! We exploit the fact the the size field will always have the index of the “last” spot in our items array, and so the append operation can easily stash the
new entry there (without worrying about moving anything down).
For example, if we call append once after creating a new IntArrayList, we will have room for 7 more before we need to grow again.
Example
Let’s try to implement the public int getAt(int index) method next — this one is pretty simple since we’re using arrays… but with one catch!
Question
What do we have to make sure is true about the requested index?
Answer
That it is within our “valid range” of indices, 0 < index < size.
As such, we’ll need to throw an exception whenever it isn’t!
...public int getAt (int index) { if (index < 0 || index >= this.size) { throw new IllegalArgumentException("Requested index out of range"); } return this.items[index];}...
Toolkit
Note the added throws IllegalArgumentException syntax in the method signature above: this alerts the compiler that there is some control
path that leads to a known exception, which is useful for some testing purposes later.
Example
We can test our class briefly with some basic empirical tests if we’d like! (just to make sure we’re on track before we’d circle back with lots of unit tests)
package main.intlist;public class IntArrayListTests { public static void main (String[] args) { IntArrayList test = new IntArrayList(); test.append(2); test.append(4); test.append(8); System.out.println(test.getAt(1)); // 4 }}
Everything looks good! On to the next…
Example
Next is the slightly-less-trivial public void removeAt(int index), which removes an item from the IntArrayList at the specified index.
This is less trivial because when we remove an item at an arbitrary index, we cannot leave a
gaping hole in our array — space is precious after all, and we need to maintain our !
We want to maintain that only indices 0 - size are valid entries in the IntArrayList.
As such, we can simply shift all of the items in our array left from the point of deletion. Let’s make a helper method for this!
.../** * Shifts all elements to the right of the given * index one left * * @param index Index at which to shift all elements to the right left by 1 */private void shiftLeft (int index) { for (int i = index; i < this.size-1; i++) { this.items[i] = this.items[i+1]; }}...public void removeAt (int index) throws IllegalArgumentException { if (index < 0 || index >= this.size) { throw new IllegalArgumentException("Requested index out of range"); } shiftLeft(index); this.size--;}...
Testing our changes, just at a glance:
package main.intlist;public class IntArrayListTests { public static void main (String[] args) { IntArrayList test = new IntArrayList(); test.append(2); test.append(4); test.append(8); test.removeAt(1); System.out.println(test.getAt(1)); // 8 }}
Excellent! Our class is coming along! Too bad we’re probably out of time in this class…
But that’s alright, luckily you’ll have a chance to finish some parts for classwork!
And there you have it! Your first, simple data structure.
Short Debugger Tutorial
Example
Let’s add a short toString override to our IntArrayList to showcase the power of our debugger!
@Overridepublic String toString () { String[] result = new String[this.size]; for (int i = 0; i < this.size; i++) { result[i] = "" + this.items[i]; } return String.join(", ", result);}
Definition
A debugger is a tool used to inspect running portions of code to verify correct functionality.
Most IDEs come equipped with debuggers, though there are standalone versions as well.
Mastering the debugger is an important tool in your coding arsenal, so we’ll look at an example together in class… on IntelliJ IDEA of course.
In any debugger, however, there are essentially 3 main components:
Toolkit
(1) Set breakpoints where you want execution of your code to pause for inspection.
Generally, these are set by double clicking on the space to the left of your IDE’s line numbers.
Toolkit
(2) Inspection panels allow you to see the state of the stack, local variables, and state of your objects from within methods.
Once you have set breakpoints in parts of interest for your code, you can find the “Start Debugger” mechanism to open your inspection panels, and run your code
(stopping at breakpoints).
Toolkit
(3) Step tools allow you to move your code incrementally forward to carefully inspect the changes of variables.
The “Step Forward” options will, most broadly, continue execution until another breakpoint is encountered (but can be used to refine the execution as well).
Example
Set a breakpoint in the loop of the toString method and then step through them to observe how the debugger works!
We’ll see a small demonstration in class now, but you can Google “Java debugger tutorial ” + yourIDEName to find out more.