Time to Git it done… here are few preliminaries about this tutorial:
Definitions
Definition
Git is a version control tool that serves an invaluable role in the software development cycle. It helps you save your work at regular, modular intervals, roll out and back changes, and a myriad of other uses.
Definition
GitHub is a remote repository for your local Git repositories, allowing your version control to be backed up the cloud, accessible from any computer with internet, and enables a variety of team collaborative tools.
Definition
GitHub Classroom is a subset of GitHub that specializes in deploying assignments as mini, personalized repositories that you will use to acquire your starting code skeletons, manage your work as you develop iteratively, and then finally to submit your products.
By now, you’ve likely used GitHub in other classes but may be unfamiliar with the procedure for GitHub Classroom, and especially, if you’re using some popular Integrated Development Environment (IDE) to manage your version control.
As such, the tutorial below has snippets that will guide you through some of these murky waters.
Preliminaries
By now, I’m assuming you’re familiar with the fundamentals of Git, and have a sufficient grasp on using its operations
(e.g., add, commit, push, pull, ...). For a refresher, watch some of the videos here:
Assignment
Definition
Make sure you have also set up your SSH Key or Personal Access Token for your GitHub account to be able to use Git’s command line tools; when doing so ensure that you give your token full permissions and make sure it never expires following the tutorial here:
Assignment
Careful
IMPORTANT: When creating your PAT ensure that you (1) set the token to never expire (or else you’ll have to do this again every semester) and (2) give yourself admin rights to ALL of the checkboxes when creating the PAT. GitHub Classroom will not function properly otherwise.
Remark
For setup instructions for your IDE / Coding Environment, see the tutorial below:
Assignment
Finding Assignments
Debug
Before beginning, ensure that you have a GitHub account and are enrolled in your section’s GitHub Classroom (each assignment will have a roster with your name in which to accept — if you do not find your name, contact me).
Independent of your development environment, your first task will be to find the assignment’s URI on GitHub.
-
Log into your GitHub account on https://github.com/
-
Find the current assignment’s Classroom Listing (it will be linked on the assignment page).
-
Accept the assignment and, for Group Assignments, ensure that you are a part of the proper team.
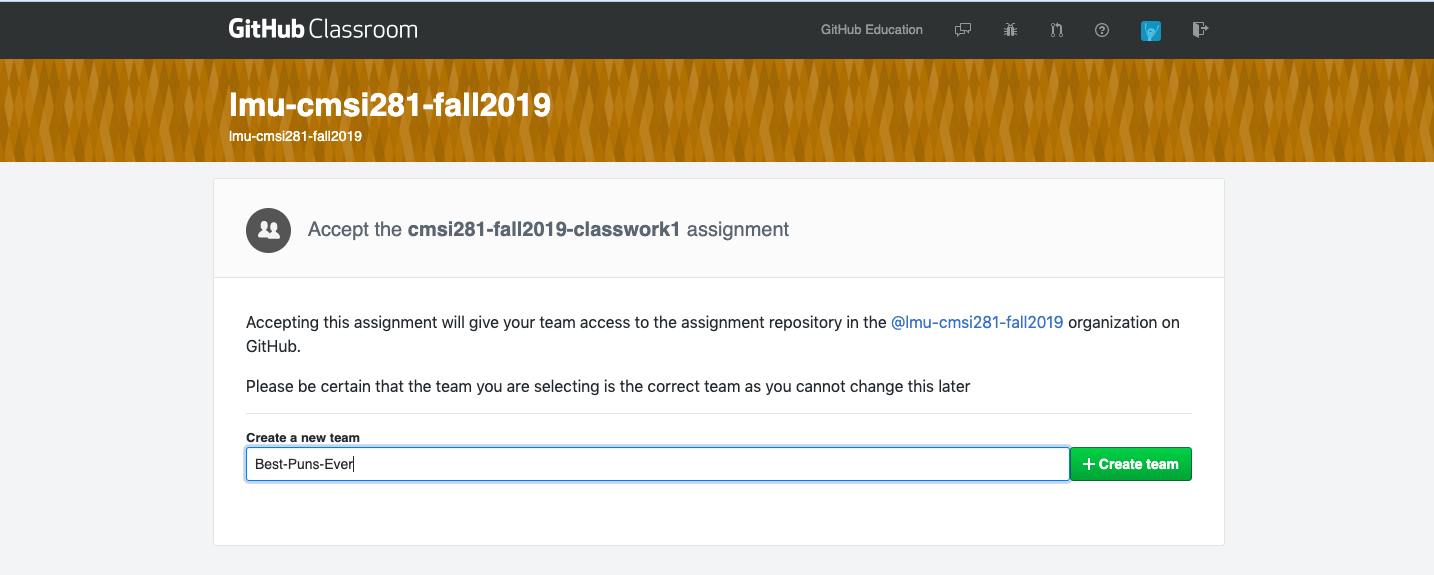
-
A personal version of the repository will be created for you after you Accept the assignment when prompted. Your personal repository will look something like
cmsi281-fall2019-classwork1-YOUR_GITHUB_USER_NAME -
On your personal repository’s page, find its URI (the location on GitHub where your remote repo lives). See screenshots below, which reveal a repository’s URI by clicking on the greeb Clone or Download button and copying the address in the HTTPS section:
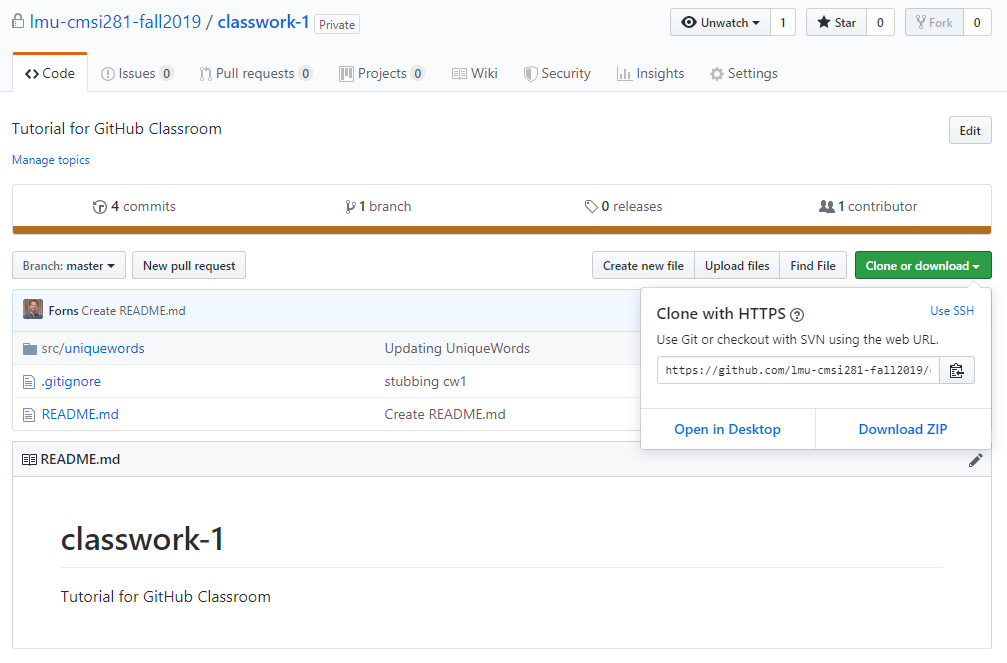
With this URI in hand, continue on to the section below that gets you set up in your particular environment!
Standard Git
This will determine where your local repository lives in your computer’s file system.
-
Open a terminal and then navigate to wherever you’d like your local repository to be stored. I recommend something like the following:
C:\Users\yourusername\git\lmu-cmsi2120-fall2021Use the
cd pathcommand to change directories to the parent folder wherein you’d like the repository to live (where “path” is a placeholder for the file path like above; you might type something likecd C:\Users\yourusername\git\lmu-cmsi2120-fall2021). -
Find the GitHub repository that you’d like to clone on your own computer. This will typically be supplied by a Github Classroom link and be available on the green Code button on any GitHub repository page, like the following:
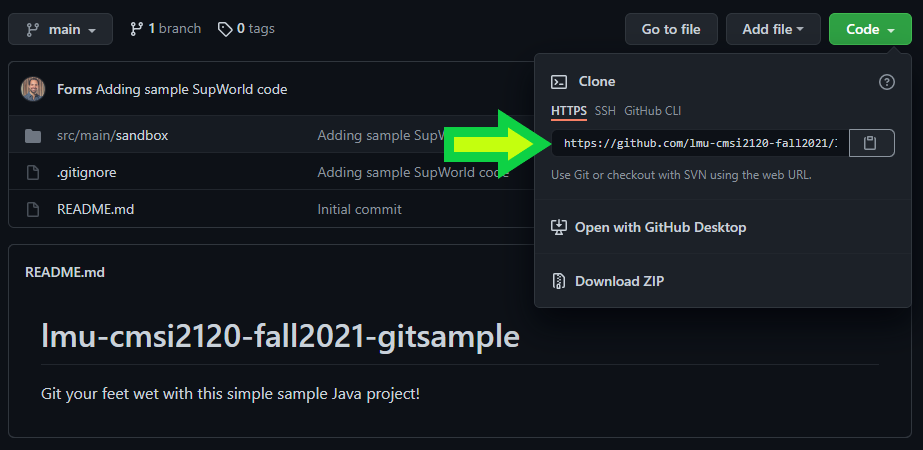
-
Clone the repository through the command
git clone <repo>where<repo>is a placeholder for the link you copied in the previous step. -
If all goes well, you should see some print out like the following:

…and yes my computer is named
FORNTRON-OMEGA
Submitting Assignments
Once you’re ready to commit changes to your repository, perform the following:
- Ensure that you’re in your terminal directory of your local git repository (typically: the folder above the
srcfolder in your repo—the one with the README.md file) - (Optional) type
git statusto make sure you have changes ready to be made — you’ll see files that you’ve edited reported by this executable if so. - (Optional) type
git pullif working in a team setting to make sure you’re working from the most updated version of others’ changes. - Type
git add -Ato add ALL changed files, otherwise, you can target specific files to be staged for the commit - Type
git commit -m "INSERT_MESSAGE_HERE"where you’ll replaceINSERT_MESSAGE_HEREwith an informative note of what this commit accomplishes. - Type
git pushto commit your changes to your remote GitHub repository — it is this step that officially “submits” your assignment.